Data Entry Guide Part3
From CaisisWiki
| Part1 | Part2 | Part3 | Part4 |
Contents |
Forms
The Forms tab is where all paper and electronic forms are printed. Paper forms can be blank or populated. Populated and blank forms can be printed for a list of patients or the current patient. Blank and populated forms have the same layout and design, but populated forms contain data extracted from the database and printed on the appropriate section of the forms. The most notable summary of information can be seen in the History of Present Illness (HPI) section of the form. An algorithm in the application extracts important milestones in the patient’s history and prints the information in a small chronological summary. Other sections of the forms are pre-populated with data as well, including medications, allergies, comorbidities, labs, biopsies, and others depending on the type of form.
Electronic Forms or eForms are designed to mimic paper forms, but eliminate the need for manual data entry. eForms display information from the database and allow the entry of new information in a similar fashion as the populated paper forms. The advantage of an eForm over a populated form is that the data is “dumped” into the database once the form is approved. Access to the eForms is limited by permissions and an attending is the only user that can approve a form. All eForms can be accessed through the forms tab by clicking on the Enter an Electronic Form for a Patient link.
Select an eForm
Selecting an eForm is similar to the manner in which the paper forms are selected. After selecting the eForm icon, a window is displayed with menus across the top of the screen. Selecting one of the menu items will load the corresponding eForm.
Once an eForm has been selected, a screen will be displayed with a menu along the left side and a details pane to the right. There are three main components to all electronic forms: entry, verification, and narrative report. The entry component is modeled after paper form and consists of sections with data entry fields similar to the Patient Data section. The menu along the left hand side allows a user to navigate between each section or to different parts of the same sections.
eForm: Entry
Menu
This form, the prostatectomy operative eform, has five sections: General, Operative Findings, NVB and Grafts, Surgical Details, and Fluids. These links are specific to this eForm, but menus in general will be used to access related sections of an eForm. As you can see in the image to the left, a section may have any number of related sub-sections. Procedures Performed and Intraop Prostate Exam are both sections of the Operative Findings and clicking on each of these links allows a user to jump to that section. In general, all forms are designed to minimize scrolling, but these menus aid in the navigation from one section to the next.
All of the data entry components of the eForm contain the same kind of entry fields as the Patient Data section plus some additional types to aid in the use of the electronic forms. eForms are being designed with clinician’s needs in mind and in general, clinical requirements are lower than research requirements. When possible, radio buttons and check boxes have been added to reduce the need for scrolling through lists of lookup options. As the use of Tablet PCs become more prevalent, electronic forms will have to take into account the use of styluses in place of a mouse and keyboard. Check boxes, radio buttons, and number pads help with this transition.
Number Pad
The image above displays an example of the stylus friendly interfaces for entering numbers in a text field. Using a stylus, you can select numbers from a keypad or calculator type interface. The number pad has other characters in addition to the numbers. Surrounding the numbers are symbols for “greater than” and “less than” and periods and colons for entering decimals or times. In the lower right hand corner is a “C” for clearing the last selected character, similar to the “Back” button on a keyboard. In the upper right hand corner is a button to close the number pad.
Entry
eForm data entry is similar to similar to entry in the Patient Data section. Although similar, there are slight differences in how a user interacts with the eForm. The most significant change is that you no longer need to click Save every time you move to another section. Clicking from section to section automatically saves the changes made in the prior section. Also, the concept of sub forms does not apply because all related sections are displayed on the same screen. Depending on the eForm, the fields available may be a subset of what is available on the main Patient Data screens.
Saving data
Changes to the eForm are saved when you move between each section of the eForm, but moving outside of the eForm requires a verification that the data should be saved. If you enter data and try to leave the eForm, a prompt will be displayed asking you to verify that the changes should be saved. This prompt will also be displayed if you try to preview the form without saving.
Although data is saved automatically, a save button has been added to the bottom right corner of the eForm for users who prefer to save between sections. Next to the Save button is a Delete button for deleting an eForm. The eForm can be deleted at any time by any user who has access to modify the eForm. To prevent accidental deletions, the prompt below verifies that the user intended to delete the current eForm.
The Cancel button will prevent the deletion of the eForm. If the OK button is selected then the screen below provides links to start a new eForm or return to the Caisis splash screen.
eForm: Validation
After the eForm is completed, the narrative report can be viewed by clicking the Preview for Approval. If all required sections of the eForm are populated, then the narrative report screen will be displayed. If a required field is not completed, then the Validation screen below displays the missing fields or sections in yellow. In the example below, the ASA Score has to be completed before the narrative can be viewed.
From this screen, you can update the required field and click Save to view the narrative. If you would like to return to the eForm, a Return to eForm button in the bottom left section of the screen allows you to return to the eForm and make additional changes.
eForm: Narrative Report
Edit Data
The eForm Narrative has two interactive states, edit Data and edit Text. In the upper left hand corner of the screen, there are buttons to toggle between Data and Text. The Data view is used to modify information entered into the eForm screen. Items that can be edited in this view are highlighted in yellow and underlined in red, as in the case above for the Nature of Procedure section.
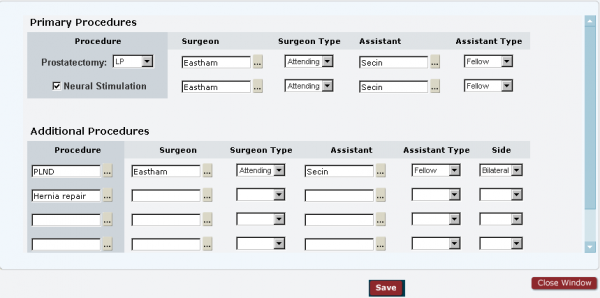
Clicking on one of the highlighted data elements will load a section from the eForm, so you can edit the information in the narrative. The image above displays the screen that loads when an items is clicked in the narrative report. In this case, the procedure was selected, so the Primary Procedures section from the eForm is loaded. Once the record is changed and Save is clicked, the form will close and the new information will be displayed in the narrative. The text that surrounds the eForm data can also be edited to user specifications.
Edit Text
When you click the Text button in the upper left hand corner of the screen, the narrative background color changes to yellow and all text can be edited. The data from the eForm is still underlined in red. Although the text can be edited, data from the eForm cannot be edited when the narrative is in this mode. eForm data can only be edited in the Data mode. Once the changes to the narrative text are complete, the Data button must be clicked save the changes to the text. If all of the information is accurate and complete, the form can be approved by clicking Approve this Form in the lower left hand corner of the screen.
Please note: The Return to eForm button will take you back to the eForm but doing so will also cause the changes to the text to be lost. To remind you of this possibility, the alert below reminds you not to leave the narrative screen unless you are willing to lose changes to the narrative text.
eForm: Approval Confirmation
A confirmation screen, see above, is displayed when an eForm has been approved. The screen also contains a link back to the main splash screen.
Forms: Batch Printing forms
Select a List of Patients
When printing forms for a long list of patients or a clinic list, batch printing is the most efficient method. Printing for a list of patients starts in the Patient List section of Caisis. After a list is selected, generally a clinic list, click the button in the upper right hand corner of the list labeled Print Forms for This List. This button will take you directly to the batch printing screen where forms can be selected for each patient.
Select the Forms to Print
The image below shows the Batch Printing screen. The patients listed are from the clinic list selected in the previous step. From this screen, there are two options for selecting forms; the first is a select box next to each patient row with a list of all of the available forms. This first option allows you to select a different form for each patient. The second option is to use the select box labeled All Patients. This field has the same list of forms as the other select boxes, but selecting a form here will assign that form to every patient on the list. Once all of the patients have a form selected, you need to click the large red button in the lower right hand corner labeled: create populated forms for the selected patients on this list.
Print the Loaded Forms
The screen below shows all of the forms after they have been loaded with the data from the database. The forms load in packets of ten and need to be printed ten at a time. The first ten forms load automatically and can be printed by clicking the Print These Forms icon (
![]() )in the upper right hand corner of the screen. It is important that the print icon is used and not the browser print button because the browser print button prints the whole screen and not just the forms. Once the first ten forms are finished printing, you have to click on the 11-15 link to print the next set of forms. Once the link is clicked, the next batch of forms will load and printing can proceed as above.
)in the upper right hand corner of the screen. It is important that the print icon is used and not the browser print button because the browser print button prints the whole screen and not just the forms. Once the first ten forms are finished printing, you have to click on the 11-15 link to print the next set of forms. Once the link is clicked, the next batch of forms will load and printing can proceed as above.
Page Setup
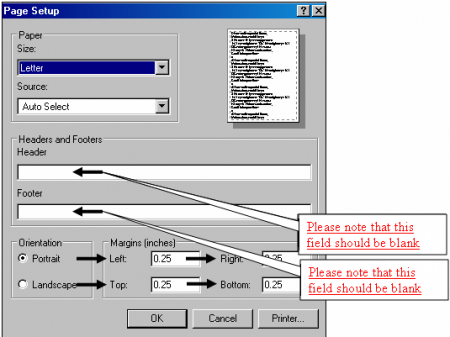
Note: Remember to remove the Header and Footer in the page set up and change all margins to 0.25. When you are finished making changes, the Page Setup should look like the image below.
Printing Individual Forms
When printing individual forms, you have the option of printing a populated form or printing a blank form. The image below marks the links to printing a single populated form or a single blank form. The image below displays the links to print populated or blank forms.
Printing Populated Forms – Select a Patient
The first step in printing a populated form is to select a patient. When printing clinic forms, the date on the forms and the physician’s name are printed from the appointments table. Therefore it is best to select a patient from the appropriate clinic list. Caisis allows you to print any patient in the database, but selecting a patient from a clinic list will add additional information to the clinic form. Once you have selected a patient, you must click on the Forms tab to load the menu above. Printing a populated form requires you to click the Print Populated Forms for the Current Patient link on the forms splash screen, see above. The image below shows the screen that loads with some brief instructions on how to proceed.
Printing Populated Forms – Select a Form
The image below displays the menu for selecting forms. The forms are sorted in menus by disease with another menu for items that are not disease specific. To continue, you must select the form you want to populate with data. Once clicked, the selected form will be loaded.
After the form is loaded, it can be printed. The image below demonstrates how similar this screen looks to the Batch Printing screen. To print the form, you must click on the Print This Form icon ![]() in the upper right hand corner of the screen.
in the upper right hand corner of the screen.
Page Setup
Note: Remember to remove the Header and Footer in the page set up and change all margins to 0.25. When you are finished making changes, the Page Setup should look like the image below.
Printing Blank Paper Forms
The procedure for printing blank forms is similar to the steps above. Since the form is not populated with patient or appointment data, there is no need to select a patient. Therefore, you can log into Caisis and proceed directly to the Forms tab. On the splash screen, select Print Blank Forms (on the right side of the image below).
Select the Form to Print
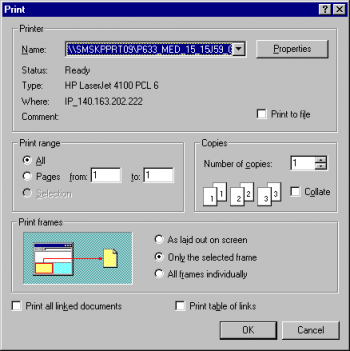
The menus and the navigation for populated and blank forms are the same. The form printing process from this point forward follows the same process described above: select the form, allow the form to load, and then click the print icon in the upper right hand corner of the screen. The only difference with printing blank forms is that you can print multiple copies of blank forms. This means that you need to be aware of the printer settings on your machine. The two main items to keep in mind when printing multiple pages are first, to enter the number of copies needed and second, to check the Collate box so the forms are printed properly (as shown on the following image).
NOTE: The Forms screens have an icon in the upper left hand corner of the screen that will return you to the Forms splash screen.
Workflows – data entry workflows
Workflows can be added to Caisis to help streamline the data entry process. The creation of workflows takes a few minutes, but requires the assistance of an administrator or programmer. Workflows are data entry workflows that allow users to step through each data entry form for a designated purpose. For instance, the example workflow above was created to help with the entry of Testicular cancer information for follow-up patients.
Workflows can be accessed from the Common Task menu. Selecting the name of the desired workflow will replace the standard Patient Data interface with the workflow steps and navigation buttons. For each step in the workflow, an administrator can specify the DVV list to display, the entry screen, a label, and whether the screen should be expanded for larger forms.
Each step in the workflow corresponds to a data entry screen found in the Patient Data section of Caisis. Data entry proceeds from left to right, so in the example above, Category was the first entry screen in this workflow. The current section is always listed in red, so the workflow example above was on the Social History entry screen. To move from one form to another, simply click on the next link or use the navigation buttons found to the right of the step names.
To aid with navigation, Next and Back buttons have been added to allow you to move forward or backwards within a workflow. The next button has an additional feature; it can be used to Save the current record and move to the next entry screen. Although the standard data entry buttons are available at the bottom of the entry screens, the Save/ Next button allows you to enter multiple records in successions while eliminating the added step of clicking save and edit. Once all items in the workflow have been updated, you can close out of the workflow interface by clicking on the finish button.


