Data Entry Guide Part4
From CaisisWiki
| Part1 | Part2 | Part3 | Part4 |
Please note, this documentation is based on Caisis version 4.0 and some admin interfaces may have changed.
Administer This System
Management of user accounts, permissions, look-up codes, and help information occurs in the Admin section of the application. Users with admin privileges can access this section via the splash screen, please see image above.
Users
Add User
In the Users section, a user can be added by clicking Add User. Once the entry screen loads, complete all of the fields with the information available for the new user: username, password, email, first name, and last name. The policies for the username format should be consistent and mirror the policies in place at your institution. The random check box automatically generates a random password for the user, but a password can be typed as well. After you submit the form, a prompt provides links to email the user their account information.
If you click Yes, the Email User screen will load and populate the user’s name, email, and account information in the body of the email. If you click No, the system prompts you to add the user to a group.
Email the New User
NOTE: The from email populates based on the admin email listed in the Web Config file.
During the installation process, this email should be set to a designated email at your institution. Once the email is sent with the user’s new account information, a prompt provides a link to add the user to a group.
Add the New User to a Group
If the admin selects Yes, then the Assign User to Group screen loads with the new user selected and a select box containing a list of pre-defined groups. (Please see Creating Groups to learn how these groups are created.)
Groups are created with roles and permissions. The management of user groups is less difficult when the group names correspond to the job titles and responsibilities of the users. For instance, if you have data managers, nurses, and physicians; then user groups should be named “Institution_DataManagers”, “Institution_Nurses”, and “Institution_Physicians” respectively. The institution name represents the name of the dataset that the user can access. In Caisis, datasets represent discrete sets of patients with their own security and access privileges. The use of datasets allows institutions to divide access to many groups of patients within the same installation of Caisis and database. (Datasets and groups will be described in more detail later in this document).
Edit / Delete User
Once user accounts are created, they can be modified and updated within the Users section of Admin. Current accounts can be edited by clicking on Edit / Delete User. Select the user to be edited and make the changes. Once complete, you must click the update button to save your changes. User accounts can also be deactivated or deleted from this screen. Clicking the deactivate - yes checkbox and clicking update will deactivate the user’s account immediately. To delete the user’s account, you must click the delete button then click OK when the alert box appears.
Update User Password
Users can request to have their password updated from the login screen, but the Update User Password section performs the same function. Using this screen, the admin can type in a new password for the user or allow the computer to generate a random password. As with adding a new user, the system will prompt the admin about emailing the new password information. The screens below display the familiar options for accessing the Email User screen and the Email User screen populated with the new password information in the body of the email.
Email User
The Email User screen is a general-purpose email option to contact users from within the application. In this situation, the to and from email addresses and email content must be typed in manually. It is recommended that the from email be the admin email for the account, but your personal email can be entered as well.
Add User Group
Add User to Group loads the same screen used to add a new user to a group. In the select user field, the admin should select the user to modify and then assign a new group from the Add New Group field. The submit button will save the changes. If a group no longer applies to a user, then the user can be removed from the group. To remove the user, you must click the delete button next to the selected group name, which will remove the group name from the user’s current list of groups.
Groups, Roles, and Datasets
Clicking on the Groups & Roles section of Admin loads the screen for creating, modifying, and deleting roles, user groups, and datasets, which are the key features of the security in Caisis. Roles directly correspond to the positions at your institution and include physicians, nurses, data managers, and administrative staff as part of the default settings. From this screen, an admin can create a role by clicking on the Add New Role link or modify a role by clicking the edit button next to a particular role.
Create or Modify Roles
Whether you are creating or modifying roles, the entry screen is the same. You must add or edit the role name, description, and the available permissions. The list of permissions checked should mirror the responsibilities of a user with this title. Once complete, you must click submit to have the changes committed to the database. It is important to keep in mind that the View Data permission should be clicked for all roles.
Manage User Groups
After clicking on the Manage User Groups link, you will notice a series of subsequent links associated to user groups. From top to bottom, the links are Create New Groups, Edit Groups or Associate with Roles, Associate Groups with Datasets, and Give Groups Access to Tabs and Menus.
Create New Groups
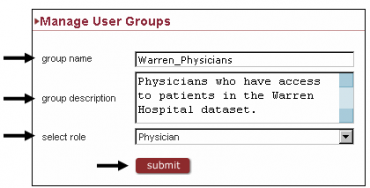
Groups are a combination of roles and datasets. Roles set the permissions for the group and the dataset specifies the population of patients that the group can access. When naming a new group, it is best to include the name of the dataset and the role, “DatasetName_RoleName”. For instance, if you have an institution as a dataset called Warren and you are creating a new group for physicians; then you may want to call the group “Warren_Physicians”, so you can easily identify the users who need to be in this group. The group description should clearly describe the group for future reference, but standard nomenclature is very important. In the select role field, you must click on the applicable role to associate to the dataset, in this example the Physicians role. Submitting this record will load a list of all available groups with the option to edit, delete, or create new groups.
Edit Groups or Associate with Roles
The Edit Groups and Associate to Roles link loads the familiar list of groups. From this screen you can edit and delete groups or add a new group using the Add New Group link. Editing a record loads the same screen as the add a new group screen and allows all fields to be edited and updated.
Associate Groups with Datasets
Datasets are discrete populations of patients with a common attribute. This attribute may be an institution, disease, protocol, or any other discerning characteristic. Datasets allow administrators to store multiple sets of patients under one login, while having the ability to apply different permissions to each dataset. Most institutions will have one dataset for every patient, but datasets can be created for a variety of purposes.
(The creation of datasets will be discussed later in this section.)
To associate a group with a dataset, select the dataset from the select dataset drop down list and select the name of a group from the add new group field. Keep in mind that the group name should clearly denote the group and the dataset as in the “Warren_Physicians” example above. Once complete, you must click submit to have the information committed to the database.
Give Groups Access to Tabs and Menus
Caisis has numerous tabs and menus that do not always apply to every user. The ability to display and hide menus and tabs has been added to prevent users from being overwhelmed with the complexity of Caisis. Customization of the menus and tabs can be applied at the group level. For example, administrative staff will never enter data, so the Patient Data section can be hidden for all members of that group. To assign tabs and menus, you must select the applicable group from the select group list. When the group is selected, the application will display any access assigned in the past. A check next to any of the items above means that the tab or menu will be visible to users in that group. To apply your changes, the submit button must be clicked.
Creating Datasets – Step 1 Update the Dimension (usually the Institutions table )
Caisis comes pre-configured with one dataset for all patients. This dataset should be used only by system administrators. Creating Datasets is a three-step process. To date most groups create datasets based on departments or services within their institutioin. In this case, the first step requires adding institution information into the Institutions table. There is an interface for doing this in the Admin under "Manage Datasets" named "Update Insitutions Table". In general, the abbreviated title of the institution or department is entered into the Institutions table. Other datasets can be created using a similar process based on Disease, Physician, Protocol, or Category. Caisis also supports datasets created from any combination of the above 5 criteria, but this logic has not been fully validated.
Creating Datasets – Step 2 Update Datasets.xml
The second step requires a programmer or an administrator to access the application source files on the web server. In the web root, find the following XML file Datasets.xml. That file has additional instructions for modifying datasets, but in short, the new dataset must be registered in this XML file. The excerpt below depicts what would be entered for the Warren dataset example. In this example, the dataset “id” is set to 4, which is important to note because it will have to match the id entered into the admin. The example below represents a dataset with one dimension where the “type” equals the table name and the “value” equals the record in the table. In effect, the XML below is simply denoting the conditions of the query similar to the one below.
If you were to add another dimension for prostate cancer to the example above, one additional “dimension” element would need to be added to the “dataset” element: <dimension type=”Disease” value=”Prostate”>. Prostate would also have to be added to the Disease table in the database. The combination of dimensions for datasets are numerous and can group patients using SQL conditions, “and” and “or”, to modify the query above.
- Dataset Query
SELECT Institutions.*, Diseases.* FROM Institutions INNER JOIN Diseases ON Institutions.InstitutionsId = Diseases.DiseaseId; WHERE InstitutionName = “Warren” AND Disease = “Prostate”;
Creating Datasets – Step 3 Update the Datasets Table
The final step in dataset creation involves entering the information from the example above into the Datasets table. This step is accomplished using the Manage Datasets section of the Admin. In the entry form displayed below, the dataset id and name must be added to the Datasets table. As noted above, the id of the dataset must match the id entered into the XML file, which in the case of the Warren Hospital dataset is 4. The information in the dataset name field will be displayed to the users, so it is best to keep it as short and as descriptive as possible. The active checkbox allows you to enable or disable datasets easily, but in general should remain checked. Once the id and the dataset name are entered, you must click submit to commit the information to the database.
Once the dataset is committed, the dataset details will be displayed on the screen below. From this screen, the dataset information can be modified or deleted. In the lower left hand corner, there is also a link to add a new dataset.
Manage Lookup Codes
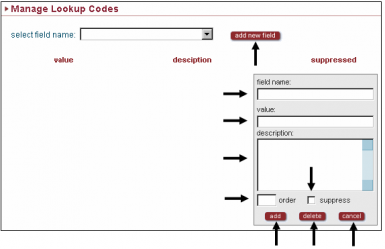
Caisis installs with a full complement of lookup codes. All of the lookup codes can be modified, replaced, or suppressed. The screen above displays the lookup codes for “BxType”. When a field name is selected from the list of lookup codes, the codes associated with that field name are displayed below. From this screen, you can click the edit buttons to modify each individual item or click the add button to add a new code to “BxType”. When you click add or edit, the entry screen below loads and displays the results for the codes being edited or a blank form for adding a new record. The field name is populated automatically and cannot be edited. To modify the lookup code, you must enter or edit the information in the value field. The optional fields, description, order, and suppress allow you to describe the lookup code in more detail, apply a sort order, or suppress values from the user interface. The default sort order for all lookup codes is alphabetical, but they can be numbered to sort numerically. The suppress check box can be checked to hide a lookup code options from the user while not having to delete values that may prove useful in the future.
Add New Field and Lookup Codes
Caisis also allows the admin to enter new lookup field names and lookup codes. To do so, you need to click the add new field button in the upper right hand corner of the entry screen. The same form used to edit lookup codes will load, but this time it will not have any information in the field name text box. The field name should loosely correspond to the name of the field where the codes will be used. Once information is entered into all of the appropriate fields, you should click the add button to add the new field name and the first lookup code. Since it is the first code, the screen will refresh, but not display the details as it did in the edit/add section. To add the next lookup code, you must select the name of the field name from the drop down list and add additional codes, following the process described above. (NOTE: New field names will need to be mapped to their target field through the code behind page of the respective entry form. An experienced developer must handle this process. Please see the technical manual for assistance.)
Refresh Lookup Code Cache
All lookup codes are cached to improve the performance of the application. If lookup codes are changed or modified, the cache must be refreshed before the codes can be visible to the users. To refresh the cache, you must click on the Refresh Lookup Code Cache button.
Special Case: Staging Lookup Codes
The lookup code names for staging drop down lists have to be constructed a specific way for the cascading feature to work. Below are the basic steps:
1. Add the disease name value to existing lookup code ClinStageDisease, if not already in list. (NOTE: this lookup code is used for both clinical and pathology staging)
2. Add staging system value to existing lookup code StagingSystem, if not already in list. Value must be entered in format SYSTEM_YY, where YY is the last 2 digits of year (i.e. AJCC_10 for 2010 or AJCC_02 for 2002)
3. Add staging values to new lookupcodes. Lookup code names should follow following format:
For clinical:
 StageClin_DISEASE_YY_T
 StageClin_DISEASE_YY_N
 StageClin_DISEASE_YY_M
 StageClin_DISEASE_YY_S
For pathology:
 StagePath_DISEASE_YY_T
 StagePath_DISEASE_YY_N
 StagePath_DISEASE_YY_M
 StagePath_DISEASE_YY_R
where DISEASE is value from step #1 and YY is 2-digit year from step #2.
Manage Help
The Manage Help section of the Admin is currently unavailable, but once complete; it will allow all help documentation and field descriptions to be updated from one interface.
System Reports
The last section of the admin is the System Reports section. Currently there is only one report, the User Statistics report. This report lists user account information with the number of logins, patients viewed, password changes, and the last login date. Detailed information about patients viewed by users can be found in the table UserPatientViews. The report can be sorted by any column with the title underlined.
Data Analysis
Reports
The Reports section contains “canned” reports that can be generated and printed. Currently there are reports summarizing a patient’s history and the number of surgical cases performed during a given year. The Reports section has the same navigation as the Forms tab with menus that are consistent with the rest of the application. The Summary Report is the most commonly used report in Caisis and it includes, narratives, summary information, and a patient’s entire chronological list. Many physicians use this report as a reference tool when examining patients in clinic.
Other reports display the statistics for the number of surgeries performed in a given year or list patients with no catheter removal record entered. Reports are printed the same way clinic forms are printed. New reports are added on a regular basis, so please refer to the application to see the most current list of reports.
Data Export
The data export tool is used to export large datasets for analysis. The export allows a user to define the tables, privacy level, purpose, and IRB details. The final output of the export is a XML file for Microsoft Access or a XML file without a schema. The XML file for Access can be used to create a new database in Access.
Parameters
The Parameters screen is used to narrow the list of tables being exported and record the purpose for the export. The Disease Type selection filters the tables to be exported. If you select Prostate, then the list of tables to export is filtered to exclude disease specific tables that are non-prostate. The Privacy Level determines how much patient information will be included. Datasets can be exported with no identifiers, limited identifiers, or de-identified. The Purpose and Review Board sections are related because the purpose for the export should have a corresponding IRB approval type. If you select Data Review Preparatory to Research, then you should have the corresponding approval and checked the Data Review Preparatory to Research approval type. The date of the approval should also be entered in the Approval Date field. The purpose and the approval type/date are saved along with a unique identifier in order to track which user exported the data and for what reason. This information is also added to the XML for tracking purposes.
Select Tables for Export
Although, the disease filters can limit the number of tables exported, the user has the additional option of selecting individual tables for export. The Select Tables for export button loads a screen with a list of tables and checkboxes. Clicking on a table name will include that table in the export.
Please Note: The “LabTests” table can be one of the largest tables in Caisis, so if that table is not required, then it is recommended to exclude it from the export.
Once all parameters are set and the export format is selected in the lower right hand corner, then the export can be performed by clicking the “Run Export” button in the lower right hand corner. While the export is running, the screen above will be displayed with instructions on how to save the export and import it into Microsoft Access.
Save the Export File
1) When the dialogue box pops up, click the Save button. Do Not click the Open button: the export will fail. 2) Save the .xml file to your local drive. 3) When download is complete, if another dialogue box appears, either click "Close" or "Open Folder"; Do Not click "Open".
Creating the Access Database
1) Open Access 2) Create a new blank database 3) From the file menu, click File -- Get External Data -- Import 4) Find the .xml file you just downloaded and click "Import" 5) Click "Okay" to accept the defaults
Query Tool
The Query tool is designed for retrieving data stored in Caisis. Using a series of qualifying statements, a query can be built to return patient data fitting one or more criteria specified by the user. Queries can be saved or modified, and results can be printed. Upon clicking the Query tab, the following screen view will appear.
Create a Query
Linking together one or more criteria creates a query. To create the first criterion, select a database field from the drop down list on the left. Next, select the desired qualifier that defines the condition of interest. Possibilities include “Starts with,” “ends with,” “contains,” “does not contain,” “equals,” “does not equal,” “less than,” “greater than,” etc. The list of possible qualifiers varies depending on the database field characteristic chosen (e.g. number vs. text). In the value or criterion field, enter the desired search value, either text or a number. If you want to add additional criteria, the linking term can be used to select the relationship between them.
Upon selecting a linking term from the drop down list, a new query search term will appear beneath the first. If the option “And” in the linking term drop down list is chosen, the query results will return records meeting all the criteria specified. If “Or” is selected, the records returned will meet at least one of the selected criteria.
Submit a Query
Once you have completed the desired search criteria, clicking the Run Query button on the upper right of the command bar will return the results. If no patient records meet the specified query criteria, an error message “No search results available” will appear.
Save a Query
If you want to periodically repeat a query, the search criteria can be saved by clicking the Save Query button on the left of the command bar. You will be prompted to enter a name.
To run a previously saved query, click the View Saved Queries button on the command bar. From the drop down menu, choose the save query to run and click Run Query.
Modify a Query
If you need to change an existing query, or modify a current one, each field in the query search term can be modified. If one or more query criteria need be removed, click the Delete button to the left of each query criteria. To start over with empty fields, click the New Query button on the command bar.
Advanced Queries - Grouping
Grouping allows the user to apply multiple query criteria to a subset of query search terms.
This immediate section of the query documentation is under construction…
Protocol Manager
The Protocol Manager was designed to track the tests and procedures associated with a clinical study. The backbone of the protocol manager is the “Schema” which consists of tests, procedures, and treatments mapped to visits. The idea of a schema came from the Protocol or Treatment schema found in protocol documents that outline the plan for a clinical study.
Getting Started
The first step in using the protocol manager is to create a Schema. There are two parts to a schema: the first Schema Items and the second intervals. Schema Items are tests, procedures, or other tasks that need to occur for the protocol. Intervals are time points at which tests and Schema Items need to occur. Together they form the Schema and allow the computer to estimate the dates of all test and procedures required for a protocol. The main protocol screen allows users to navigate to the create schema process or the manage schema interface. The select box at the top of the screen allows a user to select a protocol. Once selected, “Step 2” will list any previously created schemas that can be Managed, Edited, or Copied.
Creating a Schema
To create a new schema, enter the name of the schema into the “New Schema Name” and a “Version Number” in the fields at the bottom of the screen. Once entered, click the Create New Schema button to initiate the Schema creation process.
Schema Items
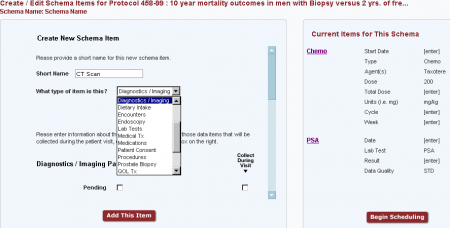
Schema items are mapped to data entry forms in the patient data section. For instance, a schema item may be a lab test, so to create that item a user must enter a “Short Name” which can be “Lab Test” or a specific test name and select “Lab Tests” from the field labeled “What type of item is this?”. Selecting “Lab Tests” will load all of the entry fields for the Lab Tests entry form found in the Patient Data section.
Creating Schema Items
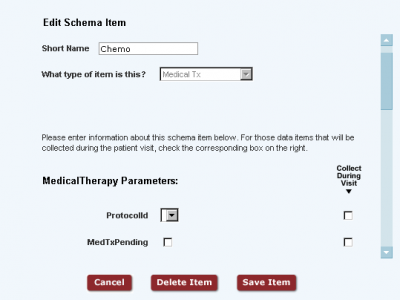
The example above displays the Lab Test form which loads when “Lab Tests” is selected. From this screen, a user can flag required fields and pre-populated fields with information known from the protocol, in this case the Lab Test, PSA.
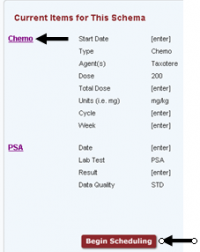
Required fields are marked using the checkboxes running along the right hand side of the screen. Checking one of these items will make the corresponding field required during data entry. Required fields will also be separated from fields not required on data entry screens to help focus users towards important fields. Populated fields are fields where a value can be added based on the guidelines in the protocol. For instance in the Lab Test example above, the user will know the test being performed, PSA, so instead of checking the field as required, the user can simply select the lab test, PSA. Populating fields with data reduces the amount of information manually entered by data management staff. Ideally, the user creating schema items should try to populate as many fields as possible. Once all of the required items are checked and all possible fields populated, click the “Add This Item” button to create a Schema Item. The details for the item will be displayed on the right with a listing of the item details, see image below.


