Eforms
From CaisisWiki
Translations: italiano
Contents |
Creating Eforms
1. Add the Xml file that defines your eform components to the “Eforms” folder of the appropriate disease module.
The following example would create an eform with one section, and two forms within that section: medications and lab tests. The interface would allow the entry of three medication records and one lab tests record. The letter notations (i.e. (A) ) are not part of the eform, but references to explain each section in more detail below.
   <?xml version="1.0" encoding="utf-8" ?>
   <eform name="GU Pros FU" displayName="GU Prostate Follow Up">(A)
       <eformSection name="Presenting Details">(B)
           <eformItem displayName="Meds" controlName="Medications"></eformItem>(C)
           <eformItem displayName="PSA Lab Test"controlName="LabTestPSA"></eformItem>
       </eformSection>

       <Medications RecordId='1'>(D)
           <Medication NotNull="True"></Medication>(E)
           <MedDose></MedDose>
           <MedUnits></MedUnits>
           <MedSchedule></MedSchedule>
       </Medications>
       <Medications RecordId='2'>
           <Medication NotNull="True"></Medication>
           <MedDose></MedDose>
           <MedUnits></MedUnits>
           <MedSchedule></MedSchedule>
       </Medications>
       <Medications RecordId='3'>
           <Medication NotNull="True"></Medication>
           <MedDose></MedDose>
           <MedUnits></MedUnits>
           <MedSchedule></MedSchedule>
       </Medications>

       <LabTests>(F)
           <LabDate></LabDate>
           <LabDateText></LabDateText>
           <LabTest NotNull="True"></LabTest>
           <LabResult></LabResult>
           <LabUnits></LabUnits>
           <LabQuality></LabQuality>
       </LabTests>
   </eform>
(A) The eform name=”” attribute must be the same as the physical file name, but can contain spaces. For example, if the file name is GUProsFU.xml then the attribute must be in the format name=”GU Pros FU”.
The value of the displayName=”” attribute will reflect the visible title of the eform on the interface.
(B) eformSection is the group of forms that will appear on the interface together. The value of name=”” attribute will reflect the title of the group that appears in the left hand navigation of the eform.
(C) The child nodes of eformSection, eformItems are the forms that will be embedded in that section. The value of the displayName=”” attribute will display under the section in the left hand navigation. The value of the controlName=”” attribute is important. It is the name of the physical .ascx file to appear in this section of the eform. It must match exactly the name of an .ascx control that is in any of the Modules/SomeDisease/Eforms folders. For example, in the above example controlName=”LabTestPSA” will embed the LabTestPSA.ascx form in the eform.
(D) These are the nodes that hold the data as the eform is submitted. The node structure must match the database tables exactly. It is not necessary to include all the columns of a table, but the parent node must match the table name and any child node used must match a column name. As in this example with Medication, if multiple records for a table are being stored, a RecordId=”” attribute must be used which matches an attribute in the respective .ascx control. In this case, if you open the Medications.ascx file found in the Modules/All/Eforms folder you will find a series of eform input controls with RecordId=”” properties.
(E) As mentioned in (D), although not all table columns need to be listed, if a child node is present it must match the name of the table column exactly. Allowable attributes for child nodes are: • Required=”True” : A Required attribute will prevent a user from going past the data entry step without providing a value. • NotNull=”True” : A NotNull attribute requires that a value is present only when other fields of this record have a value. Typically used with a field that is non nullable in your database.
In the example provided, the Medication has a NotNull attribute which will prevent users from going past the data entry step without providing a Medication value only when other values for this record are present.
The system was structured so that all eform data is stored in a temporary state prior to eform approval. This temporary state is an XML string which in is stored in the EFormXml field of the Eforms table. When the eform is approved, this XML string is parsed and the data is inserted into the respective Caisis tables.
You may also find times where you would like to collect information, but there is no table/field in Caisis for this data. For this scenario, we provided a <NoTable> node. Under the NoTable node you can create child nodes that have no matching Caisis database fields. On approval, this data will be inserted in the field of the table specified in the PutDataInTable="" PutDataInField="" attributes. At MSK, we typically put this data in the “Encounters” table, “Notes” field.
You may create your eform from existing components(.ascx files), or you may create your own components. Part II of this document will discuss creating your own eform components.
In version 4.0, to register your new eform add a reference to it in the App_Config/EformRegistry.xml file.
Eforms Controls
Eform Transforms
Overview
After the Eform ”Data Entry” step follows the “Review Data” step where the data just entered into an eform can be presented in a format similar to a paper form. Fields can be edited via a pop up window on click. This “paper like”, or transform, view of the data is generated by creating an .xslt stylesheet to transform the eform xml data.
A custom .xslt transform is optional. By default the system will generate a bullet point list of the fields you entered that does not resemble paper.
For our eform custom transform example, we will be using the most recent version (not included in Caisis 5.02) of the Liver Surgery eform. The Liver Surgery eform xml (LiverSurgery.xml) and majority of its components is located in the directory Modules/Liver/Eforms.
Requirements/Files Needed
The following files are used and/or referenced in the creation of a custom eform transform:
1. The .xml file of the eform: EformFileName.xml (i.e. the LiverSurgery.xml located in directory Modules/Liver/Eforms)
2. The corresponding .xslt file: EformFileName.xslt (i.e. the LiverSurgery.xslt located in directory Modules/Liver/Eforms)
 TIP:  The eform’s  .xslt file MUST have the same base file name as its corresponding .xml file.
 It must also be located in the same folder as its corresponding .xml file.
 TIP:  If you choose to use a stylesheet for your eform transform, we recommend reusing code from
 existing .xslt files to minimize the amount of development time.
3. The eform template library EFormTemplateLibrary.xslt (located in directory Core/Eforms)
 NOTE:  The EFormTemplateLibrary.xslt  is used to house the most common styles and patient
 data used for eform transforms.   However, as eform transforms have become more complex, less and less
 styles are used exactly the same across different eforms.  Because of this, it is a better practice
 for newer eform transforms to put styles in the actual eform .xslt file, as opposed to the library.
 Still, the library should still be referenced to have access to some basic patient information commonly
 used in transforms such as patient name, address, MRN, date of birth, etc.  The following code snippet
 should be included in the eform .xslt file in order to reference the eform template library
4. The .aspx.cs page ReviewEForm.aspx.cs (located in directory Core/Eforms)
 NOTE:  The ReviewEForm.aspx.cs page, when the user enters the “Review for Approval” section, is what
 actually loads the .xslt file and generates (“transforms”) the xml data.  It can also be used to generate
 and load data from outside the eform xml (i.e. existing patient data in database).
 See section Displaying Existing Database Data in Transform for more information.
Transform Stylesheet Basics
XSLT (Extensible Stylesheet Language Transformations) is a declarative, XML-based language used for the transformation of XML documents. The original document is not changed; rather, a new document is created based on the content of an existing one. (for more information and examples, visit [1] or simply search for XSLT examples using any search engine)
Eform transforms utilize basic XSLT functions for displaying eform data and performing calculations. The following are some examples of functions used existing eform transforms.
1. XSLT Variables - used to declare a local or global variable.
Initializing Variables:
 NOTE:  In the LiverSurgery.xml file, “NoTable” is the parent node/table name,  ProcApproachGlobal_40”  is the
 child node/field name.  See section 3.  XSLT For-Each below for more information.
Referencing or “calling” a variable:
 NOTE: The variable is global if it's declared as a top-level element, and local if it's declared within a template.
 See section 4.  XSLT Templates below.
NOTE: Once you have set a variable's value, you cannot change or modify that value.
TIP: You can add a value to a variable by the content of the <xsl:variable> element OR by the select attribute.
2. XSLT Params - used to declare a local or global parameter.
Initializing params:
Referencing or “calling” a params:
NOTE: The parameter is global if it's declared as a top-level element, and local if it's declared within a template.
3. XSLT For-Each - allows you to do looping in XSLT; used to select every XML element of a specified node-set.
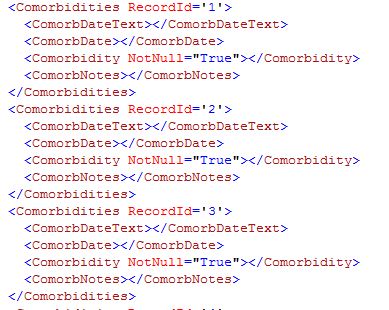
Below is a sample Node set from the LiverSurgery.xml file for the Comorbidities database table:
Below is the corresponding xslt for-loop in the LiverSurgery.xslt file that loops through the above node set in the .xml file, and retrieves the stored data:
 NOTE: The value of the select attribute is an XPath expression.  An XPath expression works like navigating a file system;
 where a forward slash (/) selects subdirectories.  For this example,  the select attribute loops through Comorbidity nodes that
 have a RecordId >= 1 and RecordId <= 15.
 NOTE:  The <xsl:choose> element is used in conjunction with <xsl:when> and <xsl:otherwise> to express multiple
 conditional tests.   If no <xsl:when> is true, the content of <xsl:otherwise> is processed.  If no <xsl:when> is true, and no
 <xsl:otherwise> element is present, nothing is created.  For this example, processing is done ONLY when either xml node fields
 ComorbDateText, Comorbidity, OR ComorNotes have values.
4. XSLT Templates - used to build templates.
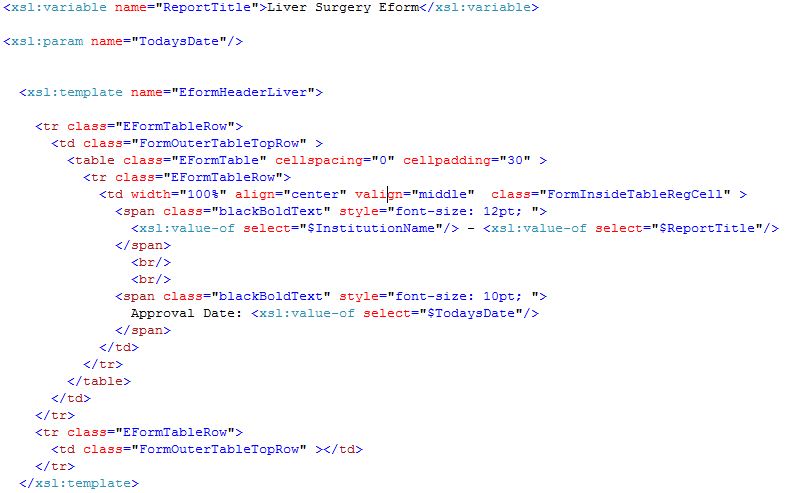
Initializing templates:
 NOTE:  In this example, “InstitutionName” is a param already initialized in the EformTemplateLibrary.xslt, which is being
 referenced in the LiverSurgery.xslt file.  (see section Requirements/Files Needed above)
Referencing or “calling” a template:
Displaying Eform Data in Transform
Every transform consists of a primary or base template that builds the page by combining “sub” templates. The “sub” templates can represent the data entered in the various components of the eform “Data Entry” section. Below is a screen shot of 1 component of the Liver Surgery eform Data Entry section, with sample data (note that the name of the section the component is in is “History of Present illness”):
Below is the corresponding xml node (located in LiverSurgery.xml) that gets populated once the user enters data and saves the eform:
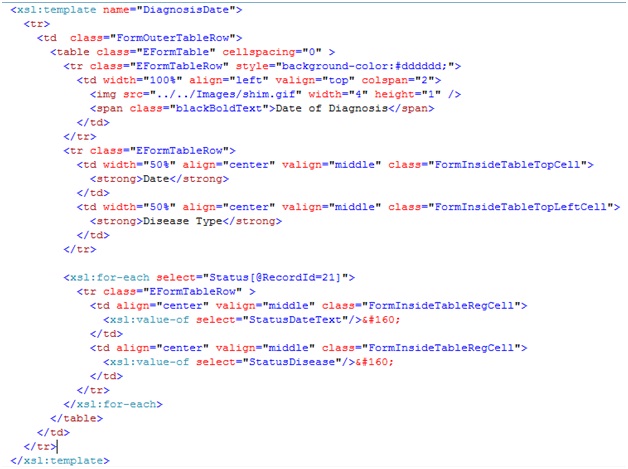
Below are the “sub” templates created in the .xslt file that will display the diagnosis information and its corresponding header:
NOTE: See how the Status Node from the xml is referenced in the XSLT for loop: <xsl:for-each select="Status[@RecordId=21]">
 NOTE:  See how the fields from the Status Node are referenced to retrieve the data stored:
 <xsl:value-of select="StatusDateText"/>
 <xsl:value-of select="StatusDisease"/>
Below is a snippet of the base template that includes the new Diagnosis Date sub template for the LiverSurgery.xslt file:
The base transform template MUST have the attribute match="eform" and is usually located as the very bottom of the .xslt file, with the “sub” templates definitions located within it.
pageMaxHeight overrides the global javascript variable of the same name that controls the dynamic page breaking. 1050 is the typical value, but it can be adjusted to use less or more of a page when the transform is created.
McGillEformsStyles is an example of referencing a template from the EformTemplateLibrary.xslt file (see section Requirements/Files Needed above).
As you saw with the EformHeaderLiver template example in section Transform Stylesheet Basics above, the “sub” templates are normally styled as table rows. Then each “sub” templates (or table row) is combined in the base/primary template table as indicated above. Notice the calls to “sub” templeates HPIHeader and DiagnosisDate.
The last table row in the above example represents the “footer” of the transform.
 NOTE:  There is global page breaking javascript (located in ClientScripts/FormsJS.js) that assumes the first sub template
 (or table row) of the base eform template is the transform “Header”, and assumes the last template (or table row) is the transform
 “Footer”.  It takes the Header and Footer and repeats them on every page.  Ensure that in your custom transform the first template
 or table row is the Header and the last is the Footer.
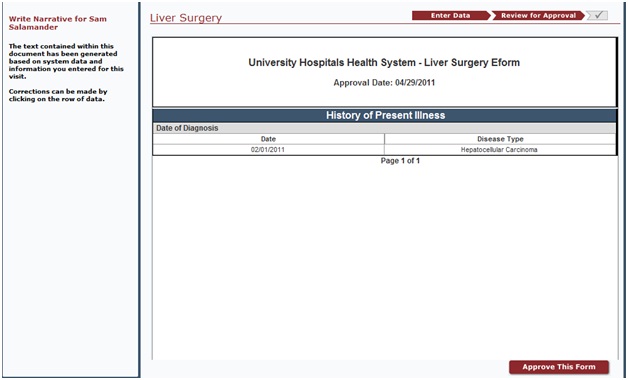
Below is a screen shot of the resulting transform seen by the user in the “Review of Approval” section of the eform:
Displaying Existing Database Data in Transform
COMING SOON
Editing Eform Data From Transform
The ReviewEform.aspx page contains javascript functions that can be called from within the .xslt file that will allow a user to click a transform section (table row) and open a pop up window that will display the corresponding Data Entry component and allow the user to make edits and save, without actually returning to the Data Entry section of the eform.
Below is an example the Chief Complaint component of the Liver Surgery Eform and its corresponding xml nodes.
Below is the “sub” template created in the .xslt file this will display the complaints:
the attributes onmouseover="this.className='chronListHilighted';" and onmouseout="this.className='EFormTableRow'" handle the mouse over and out affects
the attribute onclick="LoadComponentByField('EncChiefComplaint', 'Encounters')" handles displaying the popup window, specifying Table “Encounters” and table field “EncChiefComplaint“
 NOTE:  the pop window can also be invoked using javascript function LoadComponentByTable([TABLENAME], [RECORDID]).
 See other “sub” templates in the LiverSurgery.xslt file, or any those existing eform transforms, for examples.
Call the chief complaint “sub” template in the base template as follows:
Below is what the resulting transform looks like to the user:


